Key Takeaways
- Pre-planning is crucial. Before you even mount a camera, decide on the project scope, duration, and purpose of the footage to ensure you choose the right camera and viewing angle.
- Choose the right gear and location. Select either a fixed camera or PTZ with or without IR technology for your specific needs, then mount it on a sturdy, unobstructed vantage point like a rooftop or pole to capture the full build.
- Prioritize consistent power and lighting. A reliable power source, whether wired or solar, is essential for continuous recording. For the best results, position the camera facing north to minimize sun glare throughout the year.
- Review and refine your footage. After setup, confirm the camera’s view is correct. Later on, you can remove unwanted frames from bad weather or inactive periods to create a clean, professional final video that effectively showcases your project.
Construction time-lapse cameras are a powerful tool for monitoring jobsite progress and documenting every stage of a build.
Knowing how to set up a construction time-lapse camera in strategic positions ensures you capture clear, high-quality footage for project documentation, marketing, and client presentations.
Proper placement and settings allow construction teams to track progress remotely while creating compelling visuals that showcase the full scope of a project from start to finish. This guide will walk you through the process, from initial planning to final video production.
Pre-Planning
Before setting up your camera, consider these key pre-planning steps:
- Review project scope & duration (short, medium, or long-term build)
- Determine footage purpose (marketing, documentation, legal, stakeholder updates)
- Check site access permissions and safety requirements
- Identify privacy considerations (e.g., blurring license plates or neighboring properties if needed)
- Review architectural/site plans to choose the optimal viewing angle
Choosing the Right Time-Lapse Camera for Construction
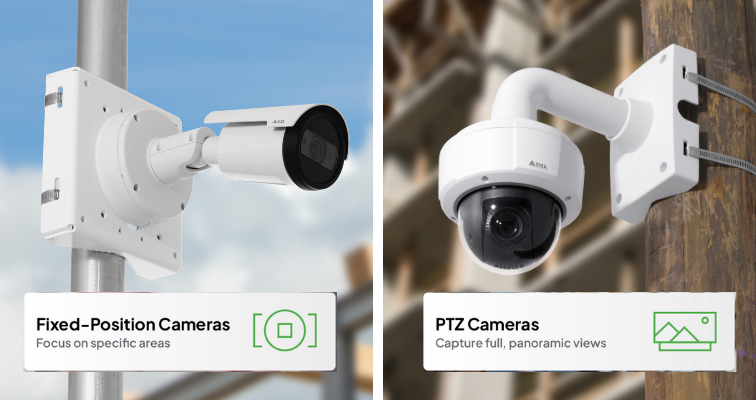
When setting up a time-lapse camera, the type of camera you choose is important. Fixed position cameras offer the most stable time-lapses, while Pan-Tilt-Zoom (PTZ) cameras offer the option for panoramic time-lapses to capture wider areas or capture detailed time-lapses further away from the camera with optical zoom. For night monitoring and jobsites with challenging lighting, cameras with built-in IR technology allow for continuous 24-hour time-lapses, even in low light or total darkness.
Strategic Camera Placement & Mounting
Select high, wide vantage points (e.g., rooftops, cranes, poles) to capture the full site and multiple perspectives.
- Ensure no obstructions now or in later build phases
- Use sturdy, weatherproof mounts and housings that can withstand wind, dust, humidity, and vibration.
- Safety & compliance: Adhere to site access rules, obtain necessary permits if mounting on public property, and address worker privacy concerns proactively.
Camera stability is crucial for a cohesive final time-lapse. Follow the camera’s manual closely to be sure that your camera is mounted properly and securely. If you’re using a non-penetrating roof mount option for your camera, ensure adequate ballast material is holding the mount in place. If possible, avoid mounting the camera in a spot that experiences high winds.
Power & Lighting Considerations
Properly managing power and lighting is key to a continuous, well-lit time-lapse.
- Power Source: A wired power source is the most reliable option for continuous operation. For remote locations, a solar-powered system with battery backup offers excellent long-term autonomy.
- Lighting Considerations: The sun changes position in the sky throughout the year, so time-lapses might start out looking good in the spring when facing south, but have issues in the winter when the sun is lower. To minimize this, position your camera facing due north. This provides more consistent lighting throughout the day and year, resulting in a cleaner, more professional final video.
Check Your View & Capture Quality
When learning how to set up a construction time-lapse camera, it’s essential to position it to capture the entire build from start to finish. Avoid angles that are too tight on the base, especially for multi-phase projects, as relocating the camera later can create jumps in the time-lapse. After installation, log in to your platform to confirm the camera is level and capturing the intended view. Platforms such as TrueLook also make it easy to remove unwanted frames, including bad weather, nights, or weekends, ensuring your final time-lapse is smooth, professional, and showcases your project effectively.

Pro Tip: If the camera’s angle is too tight on the base of the building, it may need to be relocated when subsequent stories are added, which could create an odd jump with the view change in the middle of the time-lapse. This is especially important in multi-phase projects, where new components may obscure the camera’s view.
Other Things to Keep in Mind for Your Project Time-Lapse:
- Your camera will need a consistent power source, whether it’s 110V or solar.
- When setting up your custom time-lapse, do you want to include off-hours when there is no activity on site?
- This can add length to your time-lapse while not showing as much visual value.
- Is there a certain time of day that would be ideal to capture for documentation or visuals?
- How many images do you want to capture each day, and how frequently?
- The more images you capture, the longer the final video will be.

The more active time-lapses you have on a project, the busier the camera will be, which can impact data usage, storage, and camera availability for any live viewing needs.
- A few days after your time-lapse starts capturing images, it’s a good idea to check on the image quality so you don’t have surprises later on. Here are some quality markers to consider:
- Is the camera angle crooked?
- Is the sun creating a glare in any of the images?
- Are you capturing images during the times you want?
Finishing Touches on Your Time-Lapse
- Remove unwanted frames (bad weather, nights, inactivity)
- Add company logo for branding
- Archive final video & source images for long-term access
Start Showcasing Your Construction Projects with Time-Lapse Cameras
Time-lapse cameras are an essential tool for construction firms looking to monitor progress, document every stage of a build, and also create compelling marketing visuals. By understanding how to set up a construction time-lapse camera, including pre-planning, strategic placement, power management, and remote monitoring, builders can capture high-quality footage that highlights the full scope of their projects from start to finish.
If you would like to review or adjust camera positions, capture intervals, or the number of time-lapses, our team can help optimize your setup for maximum coverage and efficiency. Contact our Customer Success team at customersuccess@truelook.com to get started.
Superb Image Quality. Unbeatable Value.
The stability and simplicity of a fixed-position construction camera make it the optimal choice for capturing a singular, high-definition view of a jobsite.